JMC: Japanese Military Chess for the BBC Micro - Part 1
Introduction
In the course of acquiring a working BBC Master, I’ve ended up with two working BBC Masters because what can you do with a precious albeit broken piece of computing history other than get it repaired? The sacrilege of people who turn classic Macintoshes into fish tanks aside. Anyway, the only logical thing to do at this point is to network them together with Econet, Acorn’s vintage local area networking technology.
What can you do with an Econet? You can share your files, share your printers, and even… play some games. There aren’t many Econet games out there and they all seem to be of the Multi-User Dungeon genre. So, I thought it would be fun to try and write a new one.
What would make a good new multiplayer game for the BBC Micro? Enter Japanese Military Chess , a game similar to the more widely known Stratego or, if you’re French, its antecedent L’attaque. These are all games of imperfect information wherein the identity of your opponent’s pieces is kept secret at the start of the game and hence the outcome of an attempt to take a piece is often uncertain. The key difference between Japanese Military Chess and these other games is that it requires the use of a referee in order to determine the outcome of battles without revealing any other information to the players. Stratego and L’attaque, on the other hand, necessarily reveal the identity of both pieces whenever an attempt to take is made. This makes a computer implementation particularly compelling.
We’ll be looking specifically at the 23 piece variant of Japanese Military Chess with units drawn from World War I. This is played on a 6 by 8 grid of spaces. There is also a horizontal “river” separating the top and bottom halves of the board and a pair of spaces at each end of the board are merged together to form the players’ “headquarters”. Each player starts with a set of 23 pieces comprising 16 different types of piece. The first step is for each player to arrange their pieces on their side of the board, keeping the arrangement secret. Thereafter, players take it in turns to move a piece and try to take each other’s pieces until one player manages to capture their opponent’s headquarters or eliminate all their offensive pieces. Different pieces have different strength values when resolving battles and different movement abilities.
Screen Modes
My implementation for the BBC Micro will use MODE 1 for graphics. This offers a 320 by 256 pixel framebuffer with a palette of 4 colours (chosen from the massive range of 8 colours supported by the hardware) at the price of consuming 20 KB1 of the unexpanded BBC Model B’s 32 KB of memory.
It’s worth noting that the BBC Micro’s 4 colour modes pack four horizontal pixels into each byte of screen memory. Hence, it’s often good to align horizontal quantities to multiples of four. Likewise, the CRTC swizzles screen addresses such that the least significant bits of an address indicate the vertical position of the pixel within an eight line “row”, then horizontally, and then the vertical position of the row in the more significant bits. Hence, it’s also often good to align vertical quantities to multiples of eight.
The screen is tall enough to accommodate 24 pixel high sprites for each piece (8 * 24 = 192) plus space for the river in the middle and some decorations at the edge. In fact, we can reduce the height of the screen by 32 lines to 224 and return 2.5 KB of screen memory back for program use. My feeling is that memory is going to be tight (without requiring sideways RAM) so it’s a good saving to make.
With square sprites 24 pixels wide, the board occupies less that half the screen width (6 * 24 = 144). MODE 5, which halves the horizontal resolution of MODE 1, could still display the board while halving the amount of memory required for the screen. However, I’d like to use the right hand side of the screen to display other game information.
Equally, MODE 4, which reduces the colour palette of MODE 1 to just two colours, could also halve the screen memory required. However, a palette four colours will allow a colour for each player in addition to black and white. We’ll hold both of these alternative MODEs in our back pocket for now.
Sprites
The MODE decided, the first thing I wanted to tackle was the sprite drawing routines . This is often the heart of any game for the BBC Micro given its lack of hardware sprites and the pace of getting anything done in software on a 2 MHz 6502. I wanted to not only be able to render all the pieces on the screen, but also to smoothly animate them moving without flicker or tearing. The challenge is not so great as some games because I only need to move one 24 by 24 pixel sprite at a time and, because it’s a turn based game, I don’t need to handle any other game logic at the same time (except maybe sound & music, if we get to that point).
My approach is to keep a 7 byte by 24 pixel “blit buffer” in off-screen memory. The actual drawing of sprites takes place into this buffer, and then the buffer is then blitted (copied) onto the screen at the start of the next vertical blank interval to avoid artefacts. The astute among you may notice that 7 bytes actually holds 28 pixels and this is because when a 24 pixel wide sprite is not aligned on a 4 pixel boundary then it will straddle 7 rather than 6 bytes. For reasons that will become apparent later, the blit buffer uses a simple linear addressing scheme and the swizzling of screen addresses is handled in the blit routine.
A common approach I’ve read about in BBC Micro games is to store the sprites in the screen pixel format so that they can be EORed2 or whatever directly into place. If you need to move your sprites horizontally with finer granularity than one byte, store a separate copy for each pixel offset within the byte. This is undoubtedly the best option for performance, but it’s quite memory heavy and I reckon I have more cycles to spare than bytes.
I decided to store my graphics as literal bitmaps (1bpp) and apply any colour needed in the drawing routine. My initial approach was to shift my way through the bitmap one bit at a time and mask and draw a single pixel in the blit buffer for each input bit. Unfortunately, once I started counting cycles, I realised that it was going to take the vast majority of a frame (2 Mhz / 50 fps = 40,000 cycles) just to draw one bitmap. This was a problem because not only do I have a couple of other things I need to do every frame, like clearing the blit buffer and blitting it to screen, but because the graphics for each piece is actually made up of four separate bitmaps. Two for the shell of the piece, in white and in the player’s colour, and two to make up the icon that identifies it. This was way over budget!
I went back to the drawing board and wrote a new, and sadly much larger, sprite drawing routine which processed the bitmap a nibble (4 bits) at a time and was considerably faster. It has four separate hot loops for handling the different pixel offsets within a byte. The worst case has an inner loop which costs about 120 cycles per input byte (8 pixels). Hence, drawing large 24x22 bitmaps should spend about 3 * 22 * 120 = 7,920 cycles in the loops and once you add in the per draw and per line overheads we’re going to take about 10k cycles to do everything. Theoretically, that’s okay!
Animation
Everything was coming together. I just needed a few more things to get a basic sprite rendering demo working. The blit routine allows me to overwrite any byte aligned 28x24 pixel window on the screen. However, in order to animate pieces moving I need to be able to draw them on top of other things on the board. My original intention back when I was more optimistic about how many cycles I had to spare, was to redraw everything that might appear inside the blit buffer in painter’s order. However, this would clearly be too slow and would also require the ability to draw partial bitmaps clipped by the edge of the window (which would further slow down the drawing routine).
Instead, we need to obtain the pixels that go underneath the current sprite, firstly so that we can draw on top of the right background and secondly so that the background can be restored as the sprite moves away. I wrote some “grab” routines which perform the inverse of blit and read pixels off the screen to store them in a separate back buffer. Hence, to draw a sprite, we could first read in the background, draw the sprite on top, and then blit the result back onto the screen.
However, this isn’t quite sufficient for animating sprites. Before drawing a sprite in a new location, we also need to make sure that it has been removed from the old location otherwise it will leave trails behind itself as it moves. Naively, you could simply blit the background back onto the screen before drawing the new sprite, but this can’t be done quickly enough to fit into the vertical blank interval and avoid flickering or tearing artefacts on the screen. The vertical blank interval lasts about 7,000 cycles3, which might be enough to blit both the front and back buffers, but it’s not enough to prepare a new front buffer based on the screen after the background has been restored. We need a more efficient solution.
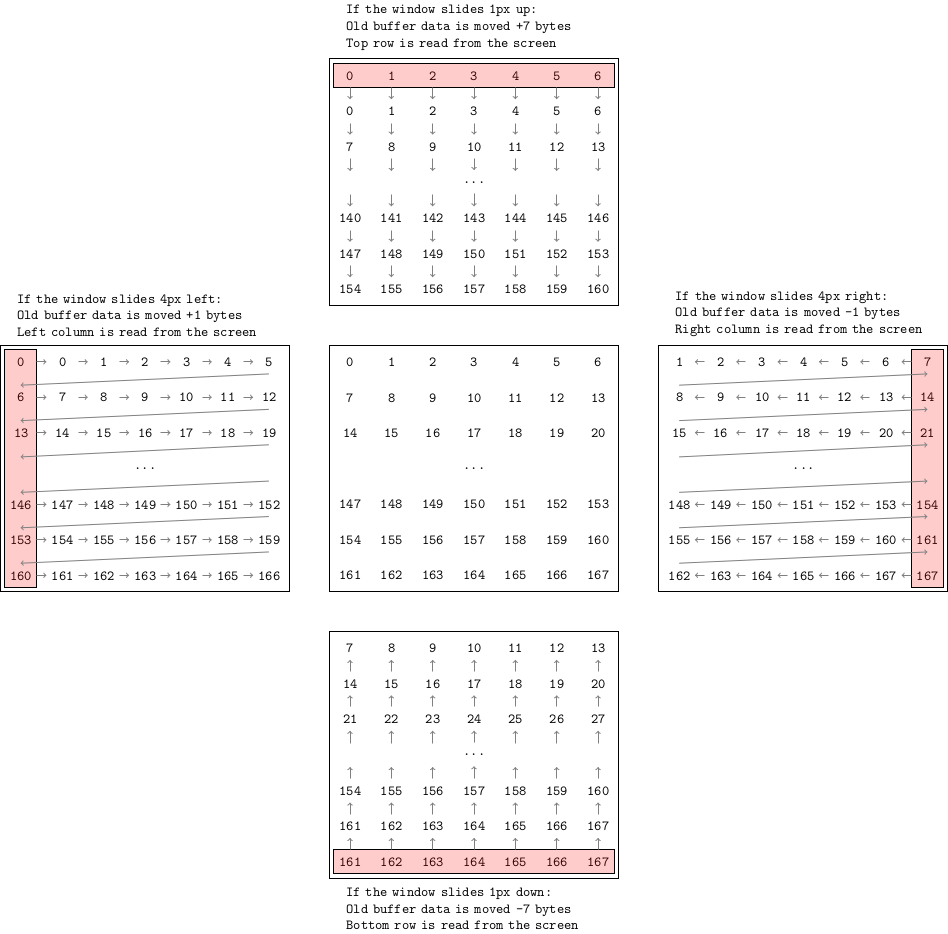
Download window sliding diagram as a PDF
The trick is to incrementally update the back buffer by sliding the window along the screen rather than rebuild it from scratch. For example, by moving every byte in the back buffer after the first 7 backwards in address by 7 bytes, the contents will be moved up by one row, overwriting the top row and leaving the bottom row duplicated. The bottom row can then be overwritten by fresh pixels read from the screen. The old data is moved in the opposite direction to the window.
Crucially, because the only pixels we read back are outside the bounds of the previous drawing window, this can all be done before removing any of the old sprite from the screen. Hence, the back buffer update can occur outside of the vertical blank interval. The other directions are simply implemented by moving the data by a different amount and reading back a different row or column.
| X | Without border | With border |
|---|---|---|
| 0 | ||
| 1 |
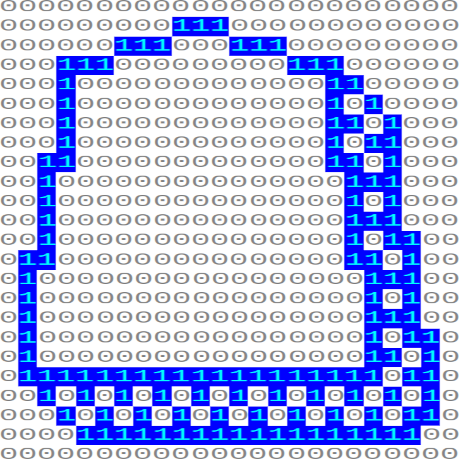
A second trick is employed to simplify clearing up the previously drawn sprite when animating movement. Graphics are positioned within the drawing window so as to always leave at least a one pixel border between the graphics and the edge of the window. This ensures that when the window is moved by one pixel and the next blit occurs, the border will restore the background without any special effort. If you want to animate moving faster the one pixel per frame, then the border would have to be thicker.
The complete process for animating movement is as follows:
- Call
prepare_front_bufferto calculate the screen address of the window and clear the majority of the front buffer, except for the rightmost column of bytes which is read back from the screen. This is because the window is one byte (4 pixels) wider than a board space (which is needed when moving horizontally and the sprite straddles an extra byte when not aligned). - Call
draw_spritesto draw the space underneath the piece. - Call
copy_front_to_backto save the background. - Call
draw_spritesto draw the piece. - Call
blit_to_screen_vsyncto display it on the screen. - Call
slide_back_up/down/left/rightto slide the contents of the back buffer in the desired direction. - Call
copy_back_to_frontto restore the background ready for drawing the piece again. - Go back to step 4 if there are more frames in the movement animation.
Demo
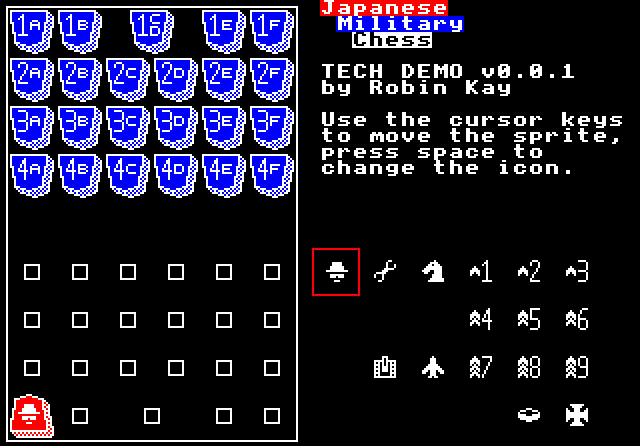
The demo combines all these sprite drawing routines, a bunch of sprites carefully drawn as binary literals in a text editor, and some keyboard handling code. You can use the cursor keys to move one of the piece sprites about the screen or press the spacebar to change between any of my beautiful 11 by 11 pixel monochrome icons :-).