JMC: Menu of the Future - Part 3
This is part 3 in a series about implementing Japanese Military Chess for the BBC Micro. See part 1 here .
Menu of the Future
A lot of classic games for the BBC Micro adhere to a well established pattern as far as the pre-game experience goes. One or more MODE 7 screens containing instructions and flavour text that you must “press any key to continue” through until the game starts. Maybe a pretty splash screen to look at while everything loads, but not too pretty or you’ll be waiting while the splash screen itself loads.
I really wanted a nice anachronistic menu for Japanese Military Chess. One that would let you easily peruse all the options, of which I intend there to be many, and perhaps let you go through the instructions both forwards and backwards.
Programmer Art
The very first thing I did when starting to work on the menu, was to draw the banner graphic which appears at the top. I slapped down some text in The GIMP and then spent ages tweaking the pixels because rasterising bezier curves doesn’t cut it when the pixels are giant blocks. Nonetheless, it probably would have taken me more time to figure out how to install a suitable bitmapped font in the precise required dimensions. The golden age is truly behind us :-P.

The flag, incidentally, was adopted by the Imperial Japanese Army in 1870 and was in use during the roughly World War I time period this variant of the game is set in. It appears printed on the standard-bearers in the wooden set of Japanese Military Chess pieces I possess. However, the design is too complicated to fit into the 11 by 11 pixels available for piece icons in this adaptation. So, the icon for the standard bearer in game is just a vaguely thematic military cross.
The banner graphic is stored in the source repository in X Pixmap format, which is great because it’s text based and hence diffable. I think it’s perfect for low-resolution indexed colour images, which is I suppose what it was designed for. It’s converted into the BBC Micro’s screen memory format by the image2beeb.pl Perl script and then included as a separate file in the disk image by BeebAsm. The game then displays it by loading it with OSFILE $FF directly into screen memory.
I have to say, overall, I’m really pleased with the quality of my programmer art. It’s one of the great things about targeting a platform with a limited screen resolution and colour palette. Producing something decent looking is so much more approachable than on modern systems. You’ll see more of it further down when we get to the bridges!
Immediate Mode
There’s only one menu screen in the current version, but I was inspired by modern immediate mode graphics libraries like imgui and egui to write a little menu building framework in anticipation of more.
A helper function called menu_item combines printing the item text and keeping count of the item’s index in the menu and whether it is currently selected. If it is selected, it prints the menu selection cursor in the right place and patches the keyboard handler to jump to the right function to handle this item if an appropriate key is pressed. A simple menu can be put together as mostly a string of calls to menu_item. At the end, menu_end handles the keyboard and if there’s any change in state then we loop back through the calls to menu_item again to update the screen.
The new game menu, as it stands, allows you to pick which colour you want to play as and how you want the bridges to be set up on the board. The former is easily implemented by swapping the second and third entries in the palette. On the subject of bridges however…
The Bridge on the River Beeb

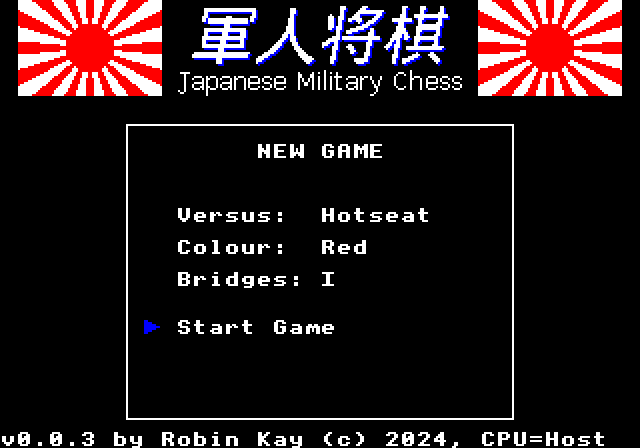
If you’ve ever played Japanese Military Chess before, you’ll immediately notice that the previous two tech demos were missing the bridges. The top and the bottom halves of the game board are divided by a river, which can only be crossed where permitted by bridges. There are various different ways of arranging the bridges and this is one of the options you can now choose in the new game menu.
Each bridge is 20 pixels tall and up to 38 pixels wide. That’s 160 bytes if stored as a bitmap, plus in one configuration there are two different bridges used at the same time and that would require 320 bytes, which is quite a lot. Instead, I broke down my bridges into 8 separate component bitmaps that could be used to construct any configuration as needed. These component bitmaps only take up 95 bytes and are included along with all the other bitmaps loaded into host processor memory at startup.
| Bridge | Graphical Composition |
|---|---|
| I | 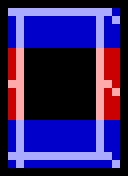
|
| Y (left) | 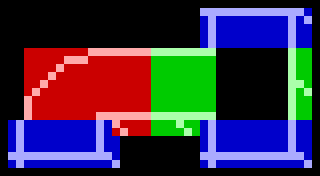
|
| Y (right) | 
|
| X | 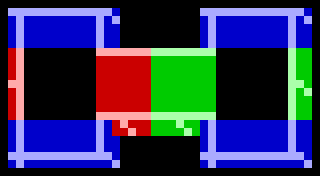
|
To assemble the bridge components on screen, they are drawn in four piece sized sections using all the same graphics code and buffers used to draw the rest of the board. The I-shaped bridges occupy only a single section, but the X and Y bridges are spread across two. Each section requires a sprite parameter block with up to four entries for drawing the components bitmaps. This data is stored in files named _B1 to _B4 and a different file is loaded into memory depending on which bridge configuration is chosen in the new game menu.
The Keyboard Animatrix
Having read one or two things about writing games for the BBC Micro, I immediately dived in with OSBYTE $79 for my keyboard handling code. This allows you to test if a specific key is pressed by activating the associated column in the keyboard’s electrical matrix and testing if the right switch is closed, or alternatively to cycle through the columns and iterate the keys that are currently depressed. It’s perfect for a fast-paced arcade game. Is the spacebar pressed down right-now, this frame? Missiles away. Kapow!
Japanese Military Chess, on the other hand, is a little bit more sedate and I quickly found myself wishing for keyboard handling characteristics more akin to those of a word processor. That is to say, rather than continuously performing an action as long as a key is pressed, we want to perform the action as the key is first pressed, and only start repeating the action with a certain frequency after an initial delay.
The premier entry-point for reading input, raised high above the statue of a mere multiplexed OSBYTE call, is OSRDCH . It reads a single character from the currently selected input buffer or blocks if none is available, plus it implements a bunch of other input features like expanding soft-keys and copy key based editing. Oddly, support for remote control over Econet appears to be handled here too.
However, the one thing OSRDCH doesn’t handle well is non-blocking input. It always blocks until there’s a character available or the escape flag is set (generally because the escape key has been pressed). This leaves us in a tricky situation if we want to accept keyboard input while running animations in the background. It might be possible to run animations in an event or interrupt handler while OSRDCH is blocked, but I understand that the operating system isn’t entirely re-entrant and this could add a lot of complexity.
Instead I decided to just poll for characters in the input buffer with OSBYTE $91 1. This actually worked out quite well for me because it avoids having to go through the motions of disabling soft-keys and cursor editing2. The buffer just gives you everything in a raw state.
The next problem is that while I like the handling of a word processor, unlike one I’m only interested in which physical keys are pressed and not the effects of shift and caps lock. The input buffer contains ASCII characters rather than the “internal key” numbers (scan codes) offered by the lower level functions. I want to normalise all the characters into their shifted values (e.g. upper case for letters) so that I don’t have to check both cases. The BBC Micro really helps me out here by having a bit-paired keyboard layout . The shifted version of every character on the keyboard can be obtained by setting the 4th or 5th bit in its ASCII code.
The upshot of all this is that I can make all of the cursors blink while waiting for input. The standard text cursor is generated by hardware in the CRTC chip, which imposes various restrictions on its size, position, and colour. Even the blinking is managed by a hardware counter independent of software, which is why if your BBC Micro is broken you might be left staring at a solitary blinking cursor on the screen. This is not sufficient for my advanced graphical aspirations!
The selection cursor in game is drawn by changing the value used to clear the front buffer before drawing. I use different values on even and odd lines so that I can create stippled patterns. Handy when the palette is limited. I find that blinking really helps you to see where the cursor is and not lose it. Not so much a problem in the less visually noisy environment of the main menu, but I made that cursor blink too.
Sharing is Caring
I wanted somewhere safe to put the code which loads and starts executing a new part of the program. For example switching between the initial loader, the menu, and the main application, all of which are stored in separate files. This had to be outside of the individual overlays themselves so that it wouldn’t get overwritten during the transfer of control. Hence, I decided to reserve the first page of the language RAM area for shared utilities that might be needed by multiple overlays. Populating this page is the first thing that the JMC loader does.
The first candidate for inclusion is obviously the file loading routine. There’s some boilerplate related to setting up the parameter block which can be shared. The transfer of control routine as well.
Next up is the string writing routine. The operating system’s OSWRCH call only accepts a single character at a time. There’s a fair amount of text in the user interface and I make some use of VDU commands to do some of the graphics too. We really want a convenient way of writing strings.
I started off with a simple routine that looped writing a number of characters specified by A from a string pointed to by XY, but the boilerplate to calculate the length of each string was annoying so wanted to switch to null-terminated strings. This presented a problem because VDU commands can quite legitimately contain zeros (or any value of byte) when specifying coordinates, colour numbers, etc. My routine therefore has to detect the start of VDU commands and disregard any null-terminators in the parameter bytes following it.
The only annoying thing about string writing now was finding somewhere to put the strings that was close to where they were used (for readability), but outside the flow of execution. This leads me into a digression that I was initially puzzled when I started writing 6502 assembler for the BBC Micro, as to why pointers were often passed in XY (e.g. for OSWORD) when the 6502 has no XY relative addressing mode. Surely, I thought, it would be more logical to pass parameters in zero page where there are actually indirect addressing modes? The answer is that it takes 8 bytes of code to load two constants into zero page, but only 4 bytes to load them into X and Y and the subroutine can do the rest of the work. There is, however, a way of making the call sites even more compact than using X and Y, and that’s storing the parameters after the subroutine return address.
If you only use a string in one place in the code, it’s convenient to collocate it with the code that uses it. Hence, I wrote a wrapper around the string writing routine that uses the subroutine return address as the start of the string and then jumps to an instruction just after the null terminator once it’s finished.
The last two routines in our shared utilities are the character polling routine I already discussed, and finally with the remaining bytes, a routine for dispatching input characters to the code which handles them. I found writing code which compares against all the possible different character values and branches to the right handler to be quite verbose, so I wrote a table driven dispatcher that matches against different character values and calls the associated handler with a parameter.
Incredibly, all these routines together consume exactly 256 bytes of code!
Demo
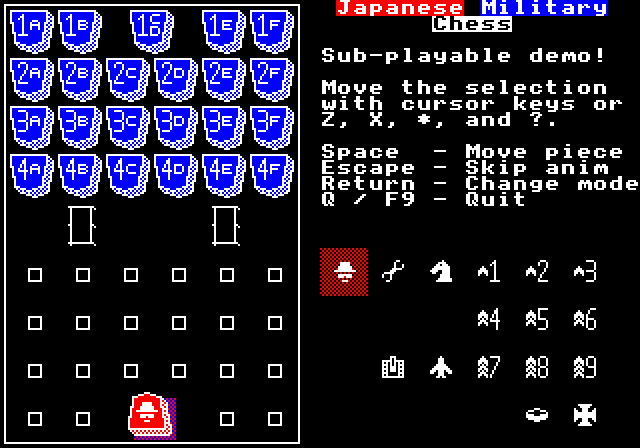
The demo is functionally very similar to the previous release, albeit a bit prettier. The main change is that the return key now switches the cursor between selecting spaces on the board on the left and selected piece types from the tray on the right, rather than just cycling through the piece types. You can also skip to the end of piece movement animations by pressing the escape key.
For the next part in the series I will aim to implement more, if not all, of the game logic and have something playable.
Play JMC 0.0.3 with JsBeeb (Single Processor)
Play JMC 0.0.3 with JsBeeb (Second Processor)
Browse source code of JMC 0.0.3
-
The currently selected input buffer can be obtained from OSBYTE $B1 . ↩︎
-
Controlled via OSBYTE $E1 and $04 respectively. ↩︎